Last Updated on May 3, 2025 by Admin
CVToolsPro has helped thousands of job seekers craft professional resumes and cover letters quickly and efficiently. However, if you’ve landed your dream job, found an alternative platform, or simply wish to stop your subscription, closing your CVToolsPro account is a simple process.
ConstructionCareerHub App is LIVE — built ONLY for construction careers. Don’t apply with a weak resume.
Get ATS-ready Resume Lab + Interview Copilot + Campus Placement Prep (resume screening, skill gaps, interview readiness) — in minutes & Other advanced features.
Explore Smarter Construction Career Tools →Quick check. Big impact. Start now.
In this comprehensive article, we’ll walk you through the process of canceling your CV Tools Pro subscription online. We’ll also address frequently asked questions and provide helpful tips to ensure a smooth cancellation experience.
Table of Contents
Common Reasons for Closing a CVToolsPro Account
Before diving into the cancellation process, here are some common reasons users choose to deactivate or close their CVToolsPro account:
- You’ve already secured a job and no longer need resume services.
- You’re trying a new platform with different features or pricing.
- You’re streamlining digital accounts for better data privacy.
- You want to avoid recurring charges or manage your budget.
- You accidentally signed up for a trial and don’t want to be billed.
Whatever the reason, CVToolsPro respects your choice and offers clear paths to close your account safely.
Step-by-Step Guide to Cancel CV Tools Pro Subscription Online
To cancel your CV Tools Pro subscription online, follow these steps:
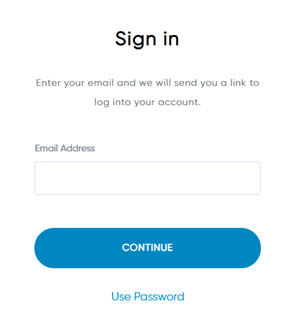
Step 1: Log In to Your CV Tools Pro Account
Visit the CV Tools Pro website and log in using your registered email address and password. If you’ve forgotten your password, use the “Forgot Password” link to reset it.
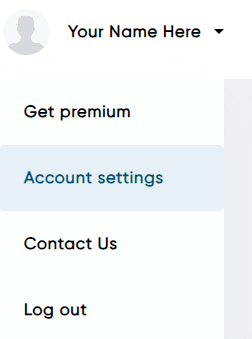
Step 2: Go to the Account or Subscription Settings
Once logged in, navigate to your Account Dashboard. Find a drop-down menu in the upper-right corner of the screen. Select ”Account Settings” from the menu options.
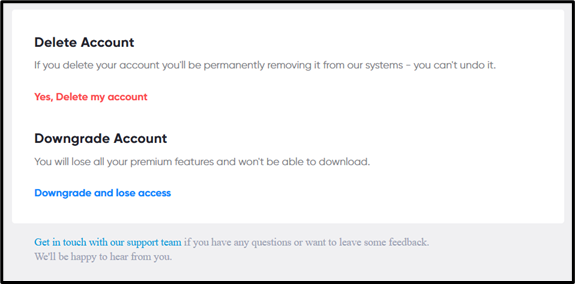
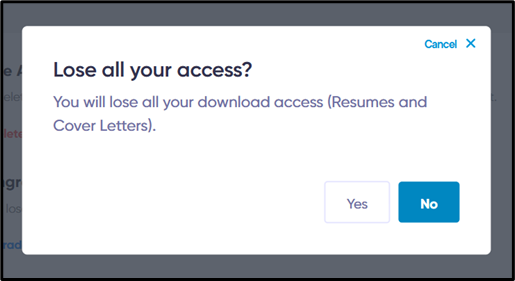
Step 3: Locate the Cancel Subscription Option
In the subscription settings, look for a button – “Downgrade and lose access”. Click on it to begin the cancellation process.
Step 4: Follow the On-Screen Prompts
You are asked to confirm your decision, provide a reason for canceling, or review your plan’s features before proceeding. This is often part of a retention strategy to persuade you to stay, but you can skip or complete the required steps.
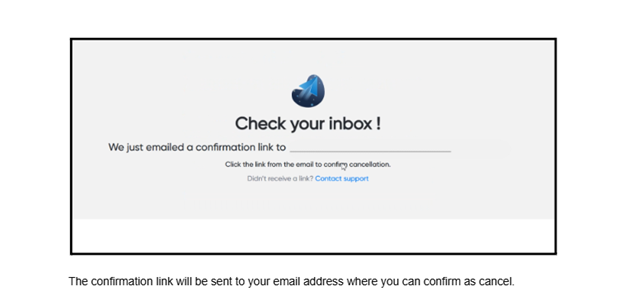
Step 5: Confirm Cancellation
Once you’ve completed the prompts, You should receive an on-screen notification and a confirmation email stating that your subscription has been successfully canceled.
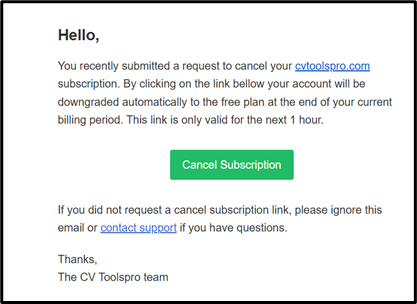
Step 6: Save Confirmation for Reference
Keep a copy of the cancellation confirmation email or take a screenshot of the cancellation status for your records. This can be helpful if there are any billing issues later.
Tips for a Smooth Cancellation Experience
1. Cancel before the next billing cycle to avoid being charged again
Most subscription services operate on recurring billing cycles. If you cancel after the cycle renews, you might be charged for an additional period (monthly, annually, etc.), even if you no longer plan to use the service.
Tip: Mark your billing renewal date on your calendar and aim to cancel at least 2–3 days before it to give processing time.
2. Use the same email that you used when signing up
Companies typically verify your identity using the email address on file. Using a different email can delay or complicate the cancellation because support teams may struggle to locate your account.
Tip: If you have multiple emails, search your inbox for the company’s welcome or billing emails to confirm the correct one.
3. Check your email inbox (and spam folder) for a cancellation confirmation
A legitimate cancellation process usually ends with a confirmation email or receipt stating that your subscription has been successfully canceled. This document is your proof in case of billing disputes.
Tip: If you don’t receive a confirmation within 24 hours, follow up with customer support.
4. Take screenshots of each step, especially the final confirmation page
Screenshots serve as evidence that you completed the cancellation steps. This can be invaluable if your cancellation is later disputed or if you’re mistakenly charged again.
Tip: Save the screenshots in a dedicated folder and label them with the date for easy reference.
5. Contact customer support via email or live chat if you don’t see a cancel option in your dashboard
Some services make it hard to find cancellation buttons or require you to contact support directly. If the option isn’t clearly available, reach out via official support channels and clearly request a cancellation in writing (so you have a record).
Tip: Always ask for written confirmation of cancellation during the interaction.
Final Thoughts
Whether you’re transitioning to a new job, switching platforms, or simply cleaning up your digital subscriptions, closing your CVToolsPro account is a quick and straightforward process. Just make sure you download your important documents and confirm your cancellation to avoid unexpected charges.
If you still need assistance or have doubts, CVToolsPro’s customer support is available to walk you through the process. They’re committed to a customer-first approach, even when you’re parting ways.